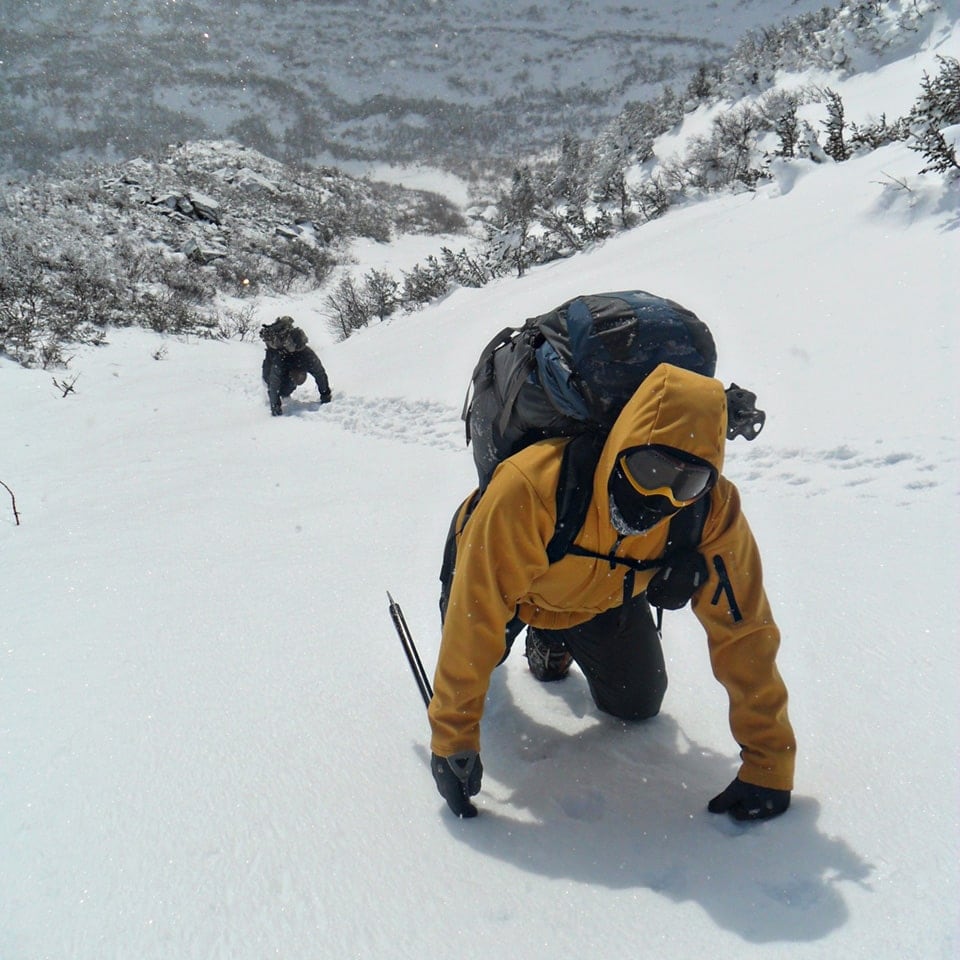
Our very popular Mountaineering Skills course is available from December through April (as conditions permit). We can tailor this course to your skill level, from introductory to advanced. This course is available in two lengths (with or without an overnight):

  • 3 days with or without 1 overnight
  • 2 days with or without 1 overnight (an alternative for people who may find it difficult get 3 days free in their schedule)
  • Overnight or no overnight? If you already have solid winter camping skills, we would recommend choosing the no overnight option as that will give us more time and energy to focus on mountaineering skills, movement, and locations.

While many people take this course over a weekend, we can easily accomodate midweek courses. We have several excellent guides on our roster, which means we can essentially customize a course for you or your group according to your individual needs and schedule. If you’re looking for mountaineering instruction or guiding in a shorter (or longer) timeframe, check out our Custom Mountaineering option.

The course cost includes all of the technical equipment: mountaineering boots, crampons, ice axe, harness and helmet. Clothing is your responsibility, so contact us for an equipment list.

This course is available as a private, pre-existing group, or via our Flexible Booking option (we’ll try to match you with other climbers).

  • Total

Pay a 50% deposit

Course Information

Mountaineering Skills Notes

  • Overnight fees includes a guide, the loan of tents, stoves, fuel, and the forest service camping fee. Overnight fees do not include sleeping bags and pads. SMG has a few bags and pads to rent, so inquire if you need one.
  • Please note that you are responsible for supplying your own food, as noted on the gear list we’ll send you. We can offer suggestions, which you can then adapt to your own dietary restrictions, allergies, and preferences.

Sample Itinerary for 3 Day Mountaineering Skills course at an intro level:

  • Day 1 – We typically meet at our office 8:30am. After getting outfitted with boots, crampons, axes, harnesses and helmets, we’ll head out to the chosen route. At the base, we’ll put on our harnesses, crampons and helmets. Typically the very first thing we’ll do is an introduction to walking and climbing on snow with crampons on. We’ll cover the basics you’ll need to know like French technique, piolet traction, front pointing, plunge stepping, etc. We will quickly add a mountaineering ice axe into the equation and you’ll learn the various axe techniques, which match with the different foot techniques. We’ll talk about how to carry and grip the tool (self arrest versus self belay, pick or adze forward), caning, high and low dagger, as well as a discussion of ice axes in general and how to choose the right tool.Once we have covered the basics of French Technique we often will move straight into self-arrest practice. We’ll practice sliding down in various positions, then rolling into self-arrest and aggressively digging the pick of the tool into the snow. You’ll practice this in the sitting position, then we’ll try it head first (on your chest, then back), and by the end of the practice session most people are relatively proficient at this important skill.

    The next thing we’ll do is break out the rope and we’ll cover tying in, belaying, and a quick introduction to snow and ice anchors. The second half of the day is spent putting your newly learned skills to the test on an actual ascent. We will typically start on lower-angle terrain, then move to steeper snow and ice. There are a lot of choices, so we can adapt the pace and difficulty to the people enrolled that day. We try to incorporate multi-pitch climbing when possible, so you’ll grow accustomed to ropehandling and belay transitions.

    At the top we’ll talk about the climb and you’ll get an overall critique of your climbing technique, then we will choose from a couple of different descent possibilities: rappelling, scrambling down along the margins, glissading, etc.

  • Day 2 – If your course includes an overnight, we normally head up onto Mt. Washington on day two. Your day will start with looking over our gear, making sure we have the essentials and nothing more. This will include a careful analysis of our food, stove and fuel. After a quick review of the day’s avalanche and weather forecast, we’ll hike the Tuckerman’s Ravine trail and set up a camp either at the Hermit Lake area or outside the Harvard Cabin below Huntington Ravine (these are the only two places we are allowed to camp on the mountain).Typically the approach to camp will take around 1.5-2 hours, and then another hour to get camp set up. If everything goes according to schedule, we should have camp established and be ready to continue on into one of the ravines by 11am. Next we’ll hike up into either Tuckerman or Huntington Ravine where we’ll pick up your apprenticeship where we left off. Activities for the afternoon could include a number of different options such as: an easy gully climb like Left Gully in Tuckerman or South or Central Gully in Huntington; an intro to glacier travel/crevasse rescue; toprope ice climbing on the Yale Ice Bulge or one of the various flows in Tuckermans, or an introduction to avalanche awareness and an analysis of the snowpack and it’s stability or lack thereof. The afternoon typically goes by fast and by dark we will be heading back to camp.

    At the bivi we’ll talk about stove use, economizing fuel, fire safety, and how to get your gear dried out for the next day. You’ll probably also be forced to listen to some of our stories, as over the years we’ve had just about everything go wrong that possibly could. There might even be a tale or two of some successes.

  • Day 3 – The plan for day three is to attempt a climb to the summit. The route we take will depend on a lot of factors including how you have progressed up to this point, and the weather. If we are feeling ambitious we’ll head into Huntington Ravine and climb one of the classic gullies all the way up to the Alpine Garden. This could be anything from mostly snow climbing in Central gully, to the 900-foot Damnation gully, which has everything from steep snow, to ice to easy mixed – all within a gun barrel of a couloir which will make you feel like you are in the Rockies or the Alps. From the Alpine Garden we will head straight up the summit cone, using lots of French Technique.Alternate routes we could take to the summit include Tuckerman Ravine (by any of the gullies or even an ice line up center headwall) or the Lion’s Head Winter Route (see the description in the course listings). After what will hopefully be a successful trip to the summit, we’ll descend via the Lion’s Head trail back our camp, break it down, then continue on to Pinkham Notch.

Sample Itinerary for 2 Day Mountaineering Skills course at an intro level:

  • Day 1 – We typically meet at our office 8:30 am. After getting outfitted with boots, crampons, axes, harnesses and helmets, we’ll pack up overnight gear including tents, sleeping bags, stoves, food, fuel, etc. After a review of the day’s avalanche and weather forecast, we’ll drive up to Pinkham Notch where we’ll gear up for the approach to camp, which will be set at the Hermit Lake area or outside the Harvard Cabin below Huntington Ravine (these are the only two places you are allowed to camp on the mountain).Typically the approach to camp will take around 1.5-2 hours, and then another hour to get camp set up. If everything goes according to schedule, we should have camp established and be ready to continue on into one of the ravines by 11am. Next we’ll hike up into either Tuckerman or Huntington Ravine where you’ll be given an introduction to walking and climbing on snow with crampons. We’ll cover the basics of crampon work including French technique, piolet traction, front pointing, plunge stepping, etc. We will quickly add a mountaineering ice axe into the equation and you’ll learn the various axe techniques, which match with the different foot techniques. We’ll talk about how to carry and grip the tool (self arrest versus self belay, pick or adze forward), caning, high and low dagger, as well as a discussion of ice axes in general and how to choose the right tool.

    Once we have covered the basics of French Technique we often will move straight into self-arrest practice. We’ll practice sliding down in various positions, then rolling into self-arrest and aggressively digging the pick of the tool into the snow. You’ll practice this in the sitting position, then we’ll try it head first (on your chest, then back), and by the end of the practice session most people are relatively proficient at this important skill.

    If time allows, the latter part of the afternoon can be spent on avalanche awareness, including a look at layering in the snowpack, as well as some quick tests for assessing the snowpack’s stability.

    Back at camp, you’ll learn about stove use, economizing fuel, fire safety, and how to get your gear dried out for the next day. You’ll probably also be forced to listen to some of our stories, as over the years we’ve had just about everything go wrong that possibly could. There might even be a tale or two of some successes.

  • Day 2 – The plan for the second is to attempt a climb to the summit. The route we take will depend on a lot of factors including how you have progressed up to this point, and the weather. The standard routes we take are the Lion’s Head Winter Route or if avalanche conditions allow, one of the snow gullies in Tuckerman Ravine. After what will hopefully be a successful trip to the summit, we’ll descend via the Lion’s Head trail back our camp, break it down, then continue on to Pinkham Notch.

Sample Itinerary for 3 Day Mountaineering Skills course at an intermediate level:

This is just a sample itinerary and there are several variations and alternatives that will depend on the conditions, group size and ability, fitness level, etc. Some of the specific things you’ll be learning in this course include: anchor building (in snow, ice and rock), rope management techniques for multipitch technical climbs, equipment considerations/selection, ice climbing, mixed climbing, avalanche awareness, glacier travel and crevasse rescue.

  • Day 1 – Waterfall ice and mixed climbing on Mt. Willard’s Hitchcock Gully. Hitchcock is a deep gash in the southeast face of Mt. Willard with more than 1000 feet of relief from top to bottom, and everything from steep snow to grade 3 waterfall ice to a short section of tricky mixed climbing up a verglassesed chimney. After completing the gully you’ll spend the rest of the day learning about how to safely descend a multipitch technical alpine climb. You’ll learn how to set up rappels, including an in depth look at V-threads, and the opportunity to set some of your your own. In the lower section of the gully you can try your hand (in a spot with no consequences for anchor failure) at rappelling off a bollard. You will have ample terrain to work on downclimbing, both facing in and out, glissading and self arrest.
  • Day 2 – Shoestring Gully on Mt. Webster. This 2000-foot gully is one of the most classic alpine climbs in the White Mountains. The gully starts with low angle snow climbing and becomes steeper and more difficult as you gain elevation on Mt. Webster’s massive west face. The route culminates with 5-6 pitches of steep snow and bulges of grade 2/3 ice. At the top you can finish the route in the main gully, via steep snow, or you can exit right via a thin ice runnel and rock chimney. At the top you’ll pick up the Webster Cliff trail and follow it back down to the road. Shoestring is a great objective for practicing your footwork and axe techniques, as well as your efficiency with multipitch transitions, rope management, overall efficiency.
  • Day 3 – We have two options for day three, depending on the group’s inclination. Option 1 is to spend the day at the base of Willey’s Slide working on various crevasse rescue scenarios. Option 2 is to climb a gully in Huntington Ravine such as Pinnacle, Odell’s, Yale or Damnation.

Mountains, Cliffs, & Routes

Locations for this course depend on conditions, but may include:

  • Hitchcock Gully – Mt Willard
  • Shoestring Gully – Mt Webster
  • Huntington Ravine – Mt Washington
  • Willey’s Slide – Crawford Notch

It is important to note that often times during the winter the avalanche conditions can be unreasonably high in both Tuckerman and Huntington Ravine. At these times it is usually still possible to climb Mt. Washington via Lion’s Head, but the gullies in the ravines will be off limits. Under these circumstances, we can either choose to continue with the ascent via Lion’s Head or we can always bail on Mt. Washington and conduct this course in Crawford Notch or on one of the other mountains in the Presidential Range. There are many excellent options in Crawford Notch including Frankenstein Cliff, the gullies of Mt. Webster and the multi-pitch alpine climbs on Mt. Willard such as Cinema Gully, Hitchcock Gully, Cauliflower Gully, or the East Face Slabs. One itinerary we particularly enjoy is an ascent of Cinema Gully, finishing with the east face slabs which we follow to the summit of Mt. Willard. From the summit we pick up a trail which goes down the backside via a 1.5 mile trail which takes us right back to the car. Another great option when the snow conditions are good is Central Couloir, a 2000-foot gully with everything from steep snow to ice, with a long descent down the Webster Cliff trail. There are also many great spots in Crawford Notch where we can work extensively on crevasse rescue.

Difficulty

Beginner to Advanced

Length

2 or 3 Days w/ or w/o Overnight

Season

Winter to Early Spring

Inquire

Have a question about Mountaineering Skills?